

How To Build A Drawing Bench
Build a Painting Demote
Our favorite pro painter's favorite tool
Build this light, but strong bench in about 4 hours. Apply it equally a tabular array and as scaffolding also as for sitting.
Yous might also like: TBD
- Time
- Complexity
- Toll
- A full 24-hour interval
- Beginner
- Less than $20
The benefits of a multi-use demote
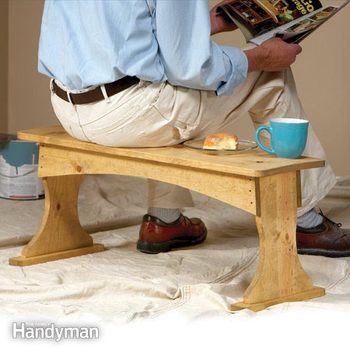
I was talking to Neb Nunn, one of our rock-star painting consultants, and my optics rested on his elegant (and elegantly beat-up) bench. He ever has it with him, so I asked him to tell me nearly it.
Twenty-plus years ago, he ready out to design the ultimate painter'southward demote. It had to exist light, so he chose pine. It needed to be the correct height to stand up on for high castor work and, of form, to sit on for breaks. Information technology had to exist easy to motion, and so he gave information technology a handle. So it had to exist like shooting fish in a barrel to haul through endless doorways while he worked. That called for curved stretchers then he could comfortably tuck it under his arm.
Bill designed not only the ultimate painter's demote but also a not bad platform for many other domicile improvement jobs. And with the correct woods or finish, information technology would be just as fitting as a high-end boot bench or a stool for the man cavern. Here's how to build your own.
Bill's Bench in Action
Pecker's demote is calorie-free and like shooting fish in a barrel to carry. It serves him equally a handy painting table and scaffold when he needs to pigment high areas. And, yep, he sits on it as well!
Step i: Buy the materials
Buy yourself a 6-ft. 1×12 and an 8-ft. one×6. Pino will toll y'all about $15. Choose any wood species you like, simply select the flattest i×12 yous tin can observe. While you're at the home centre, pick upward a small box of 2-in. finish screws and a No. 1 square-caput spiral scrap. Oh, and make certain you nonetheless have a quarter in your pocket when yous become home (more on that later).
Effigy A: Painter's Bench
Overall bench dimensions: 36" ten fifteen" x 12"
You can download a pdf of Figure A in "Additional Data" beneath.
Effigy B: Cutting Diagram
Cut all the parts from an 8-ft. one×6 and a six-ft. 1×12.
Y'all can download a pdf of Figure B in "Additional Information" below.
Step ii: Make all final cuts on a table saw

Photo one: Cut authentic angles
Utilize your table saw's miter guess when you cut all the parts to terminal length. Screw a 1×2 to your miter estimate and so y'all can clamp on a stop block for identical cuts. Cutting parallel 5-degree bevels on the top and bottom of the legs.
Figure B shows you how to lay out the parts. Cut all the parts to crude length (i/2 in. overlong) start. You tin utilize a round saw for that. Then rip the parts to final width past crosscutting on the table saw with the miter guess, including the 5-degree bevels at both ends of the legs (Photo 1). (Y'all could make all the cuts with a circular saw, but you'll get much better results with a table saw.)
Pace 3: Scribe, cut and smooth the curves

Photo two: Mark perfect curves
Marking the starting and stopping points of the stretcher curves, then scribe them using the one/iv-in.-thick scribing slat. Use the aforementioned flim-flam to marking the curve on the legs.

Photo 3: Gang-cut the curves
Clench together the stretchers and legs and cutting the curves with a jigsaw. This play a trick on will give you identical matching parts and keep you from having to mark curves more than once.

Photo 4: Gang-sand the curves
Belt-sand the curved parts to eliminate saw marks and shine out the curves. A belt sander works all-time, but an orbital sander will do the job too.
Detect in Figure B that there's a 1/four-in.- wide slat. That'south for scribing the curves on i leg and ane stretcher. When you lot rip the slat, choose woods that doesn't have any knots or it'll snap when you're angle it. Either become a helper to assistance you brand the scribes or use clamps and nails (Photo 2). It'south simple: Just mark your starting and stopping points, curve the slat and brand your scribes. Clench both boards together and make the cuts with a jigsaw (Photo 3). Then clamp both boards together again and smooth out the curves with a belt sander (Photo 4).
Step 4: Round off corners

Photo 5: Round off sharp corners
Apply a quarter to outline the outside corners, then cut and sand all of them.
Hither'southward the part near the quarter. Use information technology to mark all the outside corners for rounding (Photograph five). As well trace around the quarter to marking the ends of the handholds. And then employ a 1-gallon paint can to describe the front and dorsum of the handhold. Soften all the edges with 100-grit sandpaper, and if y'all wish, sand all the parts for finish before assembly.
Pace 5: Assemble the bench

Photo half dozen: Assemble the demote
Get-go attach the stretchers to the legs. And so screw the bench seat to the legs and stretchers, and finally, center and screw the feet to the legs.
Make all your connections with 2-in. finish screws for a stone-solid demote. A bonus is that the small heads are inconspicuous. Predrill 1/8-in. pilot holes, particularly if you're building with hardwood. Screw the stretchers to the legs first and and then center and fasten the bench seat to both the legs and the stretchers. Lastly, flip the demote upside down and spiral the feet to the bottom of the legs (Photograph 6). Cease your masterpiece whatever manner you wish. Or go au naturel—the bench, not you!
Additional Information
- Effigy A: Painter'southward Bench
- Figure B: Cutting Diagram
Required Tools for this Project
Have the necessary tools for this DIY project lined up before you start—you lot'll salve time and frustration.
Required Materials for this Project
Avoid last-minute shopping trips by having all your materials ready ahead of time. Here's a list.

Source: https://www.familyhandyman.com/project/build-a-painting-bench/
Posted by: cervantezarrierld.blogspot.com
0 Response to "How To Build A Drawing Bench"
Post a Comment